TL:DR
In this post, I will walk through the information and steps required to setup Okta custom domain. It also reveals the issues that may get in the way and how to address them.Okta is a leading cloud IAM solution and offers a free developer account. Anyone can register and use its service as long as the active monthly user count doesn't go over 1000 in the developer's account. After registration, Okta will assign an URL domain in a format of "https://dev-xxxxxx.okta.com" (xxxxxx is a random number assigned), where you can login and manage your own Okta services. If you are a paid customer, then you would be able to choose a custom naming in such way as "https://custom.okta.com".
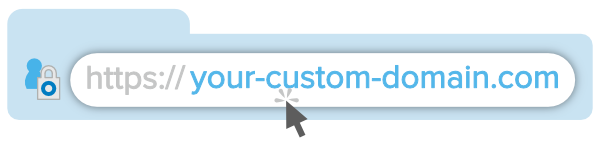
It's essential to setup a custom URL domain so that your Okta domain would look like a subdomain of your own such as "https://login.mydomain.com". Setting up a custom domain would provide you:
- Use custom domain as the issuer for the Okta default or custom authorization server so that you can have the authorization process appears as the same domain as your web application
- Customization of Okta SignIn widget and this cannot be done without a custom domain
- Not necessarily exposing Okta as your IAM solution vendor
The prerequisite of setting up custom domain for your Okta account are:
- Ownership of the domain and sub-domain to serve as the Okta custom domain
- HTTPS/TLS certificate, private key and chain files that to be applied to your domain and sub-domain. The private key has to be PEM encoded in 2048 bits.
Most of the website management services such as Wordpress or hosting services such as Netlify, GoDaddy would provide the HTTPS out of the box for your site using "Let's Encrypt", but they would not allow to download the certificates behind the site. And, neither can you gain shell access to the servers to create and install your own certificates. Then the only option it leaves out is to create the certs in your own machine and upload them to the hosting servers, which most of the vendors would be able to provide on their management panel.
ZeroSSL is a free SSL tool just does the HTTPS/TLS certs generation. ZeroSSL offers the online tool to generate certificates and the private key. But the online tool only generates 4096-bit private key and Okta requires the private key to be PEM encoded in 2048 bits. Therefore we will have to download the tool and generate them manually with custom options.
Generate Certificates and Keys
Here are the steps required to creates HTTPS/TLS certs for your hosting site as well as Okta for custom URL domain.
1. Download ZeroSSL tool. For simplicity, take the windows version as it's portable and requires no installation at https://github.com/do-know/Crypt-LE/releases
2. Generate certs and keys using the following command:
.\le64.exe --key account.key --csr mydomain.csr --csr-key mydomain.key --crt mydomain.crt --domains "login.yourdomain.com,yourdomain.com" --generate-missing --handle-as dns --legacy --api 2 --live
Explanation:
- account.key: account private key
- mydomain.key: domain private key. account.key and mydomain.key are private keys and can be generated using openssl. The downloaded tool "le" can also generate them.
- mydomain.csr: certificate signing request file for the domain requested
- mydomain.crt: certificates for the domain requested
- mydomain.ca: not in command line but will be generated at the end as option "--legacy" is used. This is called the issuer's certificate file, or CA certificate or intermediate cert.
- handle-as dns: this option asks for domain verification instead of http verfication. Http verification will generate two files which need to be uploaded to your website. Domain verification option will generate challenge key/value pair for TXT record verification on your domain.
- generate-missing: this option will generate specified files if they don't exist yet
- legacy: this is important and it's mandatory to successfully upload generated certs to Okta custom domain setup. As Okta requires 2048 bit key, legacy option will result in using 2048 bit key and placing the issuer's certificate separately in its own .ca file.
- api 2: this option will use version 2 API. Wildcard in domain is only supported in v2.0 such as "*.mydomain.com"
- live: this option is used to run the actual generation process. It's advised to "test" the process without the live option first.
During the process, the command will generate two challenge key/value pairs as two domains (sub-domain and main domain) are defined in the command. The key/value pairs need to be inserted to your domain management using TXT record for verification. Only after the domain is verified, the subsequent certs can be generated successfully.
After the certs are generated, first thing to do is to update them in your own domain. Next I will show how to config the custom domain in Okta.
Note that the generated certs will expire in 90 days. It's important to renew the certificates a few days before it expires. Auto renew can be setup only if the shell access is available to your domain servers.
Note that the generated certs will expire in 90 days. It's important to renew the certificates a few days before it expires. Auto renew can be setup only if the shell access is available to your domain servers.
Config Okta for Custom URL Domain
Login your Okta account, and switch to "Developer Console" if you are in the Classic UI mode, by clicking the top left dropdown list.

Go to menu Customization and then "Domain Name", and Click on "Edit"

Click on "Get Started"

Enter the sub-domain that is used for Okta custom domain. In the example it is "login.mydomain.com"

Okta will generate a TXT record to be inserted to your domain for verification. After inserting the TXT record, click on "Verify". It will show "Verified".

Copy/Paste the certificate and key generated in the previous step. In this example,
- Certificate: mydomain.crt
- Private Key: mydomain.key
- Certificate Chain: mydomain.ca

Make the custom domain as an alias for your Okta sign in host by creating a "CNAME" in your domain management.


Click "Finish" and then it completes the setup of custom URL domain.

With custom URL domain setup complete, I can login the Oka account by visiting the custom domain.
 Note the "Not Secure" certificate warning is supposed to be cleared away in 48 hours after Okta propagates certificates over to the custom domain, but it could take longer in reality.
Now I can customize the sign in page to tailor it to my own brand, look and feel, etc. From the Okta menu, go to Customization and then "Signin Page".
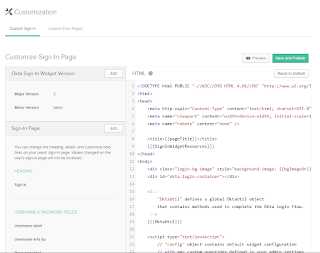

Now I can customize the sign in page to tailor it to my own brand, look and feel, etc. From the Okta menu, go to Customization and then "Signin Page".

I am also able to use the custom domain as the issuer for the Okta default or custom authorization server so that any clients assigned to the authorization server will go through the custom domain instead of okta domain.

To update your web app to use the custom authorization server, switch to "Classic UI", go to your application setup and Sign on page. Edit the OpenID Connect ID Token section, and choose the custom domain as the issuer. Now your application sign-in process will go through the custom domain.

This ends the complete process of setting up Okta custom domain.
Comments
Have you configured OKTA SSO in any ADF app?